Canon EOD 300D/Digital Rebel/KISS stuff
Changing focus screen
Modifying Canon EF Extension tube for EF-S Lens
Changing focus screen
One problem with autofocus cameras is that they are designed on the
assumption that AF is always good enough, so little attention is given to making manual
focussing easier - this is a particular problem in low light. Older non-AF cameras
incorporated various clever optical tricks in their focus screens to make focussing
easier, and it is possible to transplant these into the EOS 300D/Rebel to help manual
focussing.
I used a Canon E-A screen, designed for the EOS 620/650, which has interchangeable
screens, but any plastic screen of similar thickness ought to be adaptable.
Take great care to avoid touching the surface of the screen, as the fine surface will be very easily damaged or contaminated. Handle ONLY by the edges.
The screen needs to be cut down to 29 x 17mm to suit the smaller frame
size of the EOS300D. To help with this, I've produced this
template (PDF 7K), which you can print and lay the old screen out on to cut it. Check
thet the inner frame is 29x17mm in case of promter scaling errors.
You don't need to replicate the tabs on the original screen - it just needs cutting to the
smaller size.
The method I used was as follows :
Carefully place the screen, shiny side up on the template, taking care to get it centred
and square. Tape it down, avoiding getting the adhesive tape on the area to be retained.
Using a ruler and sharp knife, score along the cut lines. Remove the tape, turn it over
and score the lines on the other side, taking care to look straight down on the line to
avoid parallax error. This pic shows the screen after scoring :

Using pliers, carefully snap off the edges - they may come off in one or two pieces. If necessary, smooth off the edges by placing some fine (400+ grit) abrasive paper on a flat surface, and rub the edge of the screen on the paper, taking care to hold it square. Thoroughly trim any swarf and clean off dust with an air duster.
Fitting is fairly straightforward:
Remove the lens and rest the camera upside-down, i.e. sitting on the flash shoe, so the
focus screen is horizontal. It is adviseable to place something like a tissue or cloth
over the mirror to avoid marking it accidentally.
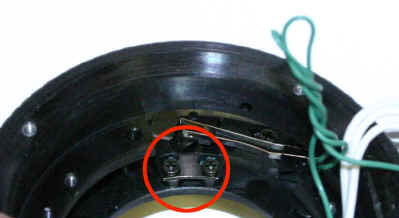
Using fine tweezers or a small pointed implement, insert the point in the small hole in the tab (circled below) of the screen retaining clip (you may need to push back the soft black foam to see it), and push the tab back towards the rear of the camera - when pushed approx. 2mm back, the clip will release and spring upwards.

Remove the clip with tweezers. Place something soft over the mirror, and tilt the body
backwards to lie on its back, and the screen (and possibly a copper coloured frame) will
drop out onto the mirror. Remove the screen with tweezers (hold by the EDGE ONLY to avoid
scratching), return the camera to the former 'upside down' position, and replace the
copper frame.
Place the new screen, shiny side outwards, on top of the copper frame, and check that
it is centred and square. (If refitting the original screen, the edge with the single tab
goes towards the rear of the camera.) Tapping the side of the camera is a good way to
jiggle it into place.
Replace the retaining clip by holding it with tweezers, insert the 2 tabs on the rear into
the holes, hinge it down until it comes to rest, then press the front tab down with a
finger until it clicks, latching the screen in place. If it doesn't click, don't force it
- chances are the screen or the copper frame is not sitting properly in place.
One disadvantage with this is you lose the focus marks - in lower light you can see a fuzzy red blob, but not very visible in brighter light. I think the marks are implemented with specially angled areas on the original one and I can't see how you could make suitable marks on a new screen - I tried making indentations in the new screen, but this didn't help at all.
Modifying Canon EF Extension tube for EF-S Lens
Canon's EOS 300D digital SLR comes with a lens in a new variation of Canon's EF format,
EF-S. This has a projection on the rear, which prevents the use of old Canon extension
tubes for close-up work. Canon have redesigned the tubes (new ones have a II designation -
e.g. EF25 II), however if you already have one of the old EF tubes, this page describes
how they can be modified to fit the EF-S lens, to save the expense of upgrading. The older
tubes will probably also be available more cheaply second-hand.
I did the mod on the 25mm EF25 tube - I have not seen the EF12 closely, but would imagine
that it could be similarly modified.
Tools required : number 00 Pozi screwdriver, either a Dremel type tool with cylindrical burr, or a large half-round file.
 Remove
4 screws (#00 Pozi) in camera mounting ring.
Remove
4 screws (#00 Pozi) in camera mounting ring.
 Remove
camera mount ring, taking care not to damage wires.
Remove
camera mount ring, taking care not to damage wires.
Remove 3 screws holding plastic inner tube
 Remove
plastic inner tube.
Remove
plastic inner tube.
DO NOT be tempted to remove the plastic block that holds the gold contacts, as the
contacts and springs will fall out and they are somewhat fiddly to reassemble!
 Turn
over. Mark a 40mm dia ring on lens side of this part. The old hole is 35mm, so the easiest
way is to use a pair of dividers to scribe a mark 2.5mm outside the original edge.
Turn
over. Mark a 40mm dia ring on lens side of this part. The old hole is 35mm, so the easiest
way is to use a pair of dividers to scribe a mark 2.5mm outside the original edge.
 On
the camera side, there are 2 mounting posts for a clip which retains the 'lens present'
detection switch. These posts are within the 2.5mm area to be removed. There are 2 options
to deal with this :
On
the camera side, there are 2 mounting posts for a clip which retains the 'lens present'
detection switch. These posts are within the 2.5mm area to be removed. There are 2 options
to deal with this :
1) If using a Dremel tool or similar, it is possible to cut away the required amount of the ring without destroying the posts - this requires a lot of care, but should just be possible, leaving enough of the posts intact for the screws to hold the clip
 2)
If cutting with a half-round file, this will destroy the posts, and render the switch
unuseable. This is no big deal as it just means the camera can't detect whether a lens is
present or not.
2)
If cutting with a half-round file, this will destroy the posts, and render the switch
unuseable. This is no big deal as it just means the camera can't detect whether a lens is
present or not.
However you need to bypass the switch so the camera thinks the lens is always present -
cut the wires to the switch contacts, strip back and twist tightly together. Ideally, they
should then be soldered and covered in heat-shrink sleeving, but twisting about 5mm length
tightly and covering with sleeving or adhesive tape will suffice if you can't solder.
 The enlarged hole in the ring after cutting.
Take great care not to damage the gold contact pins or the wires. If using a file, you will end up cutting slightly (about 0.5mm) into the plastic block that holds the contact pins - this is not a problem as long as you don't cut too deeply into it. Chamfering the hole slightly so that it is slightly larger at the lens end will help reduce the amount that you cut into the contact block.
Test-fit the lens to ensure it fits easily, without distorting the rubber surround on
the lens.
 Remove
about 1mm from the end of the inner tube, to provide clearance for the lens.
Remove
about 1mm from the end of the inner tube, to provide clearance for the lens.
The easiest way to do this is to lay some medium-grit (100-200) wet & dry (silicon carbide) paper on a hard, flat surface, and rub the tube around on the paper in a circular motion, taking care to apply pressure evenly. The amount removed is not critical - it needs to be enough for the lens to fit, but removing a bit more will not hurt.
When you have removed enough, trim off the edges with a sharp knife to remove the swarf from the rubbing operation.
To check the fit, place the tube in position without the screws, then fit the lens from below, and check that moving the lens does not move the tube, i.e. it is not touching the end of the tube.
 Thoroughly
remove all dust and swarf (use a compressed air duster if available), then re-fit the
inner tube, and then the camera-mount ring, taking care to avoid trapping any wires, and
ensuring that you mount the ring in the correct position, so the contacts line up on each
side.
Thoroughly
remove all dust and swarf (use a compressed air duster if available), then re-fit the
inner tube, and then the camera-mount ring, taking care to avoid trapping any wires, and
ensuring that you mount the ring in the correct position, so the contacts line up on each
side.
This image shows the lens end of the finished result.
 As
a finishing touch, you can add a white location mark for the EF-S lens.
As
a finishing touch, you can add a white location mark for the EF-S lens.
Use a sharp 3mm twist-drill held in your fingers (NOT IN A POWER DRILL!!!) to make a small indentation, then fill with white paint or correction fluid.
Results
The first thing to note is that an extension tube confuses the hell out of the auto-focus system, so you will always need to use manual focussing. Focus and zoom also interact substantially, and depth of field is typically small, so you will often need to use a small aperture and a tripod to cope with the correspondingly longer exposure times.
With the EF25 tube, the standard 18-55mm EF-S lens will focus objects between 0 to 150mm from the lens.

 Un-cropped images illustrating size range
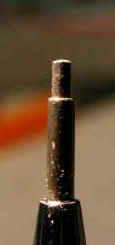 Tip of a 0.7mm pencil
 One of the screws I had left over... (lens switch clip mount)


Free Counter
